

How To Fix No Healthy Upstream Error
Mistake: VMware vCenter no healthy upstream
In the context of software development, Upstream is the action of sending package or patch to the administrator to be integrated into the source of that particular software. And "No good for you upstream" is a software error that prevents the operation of an application.
Afterward installation or upgrading to vCenter Server Appliance (VCSA 7.0 Update3), when accessed to vCenter UI url (https://vcenter:443/ui), you may encounter an fault message: no healthy upstream. The is considering of some unexpected parameters/bugs while deploying vCenter.
You tin can access vCenter Server Appliance Management Interface at port 5480 and check the services, if all services show as healthy but you lot still cannot admission web customer, you lot need to change network settings from vCenter Server Appliance Management Interface.
In this commodity, I will focus on this error and offers detailed steps to fix vCenter no healthy upstream.

How to gear up no good for you upstream fault
Earlier making any changes to vCenter appliance, you lot should backup vCenter or have snapshot. Yous can configure IP address setting from DHCP to static with below steps.
Procedure to prepare the no healthy upstream in vCenter 7.0 error:
1. Log in to VMware Server Managment vami portal with 5480 port, go to Networking, and you can see the IP address shows equally DHCP fifty-fifty if it was given as static.
two. Click EDIT at top right corner.
3. In the Edit Settings department, change the setting from Obtain IPv4 settings automatically to Enter IPv4 settings manually and click Next.

4. Enter the username and countersign for SSO credentials.
5. Review the settings and click the checkbox to acknowledge that you have made a backup of your vCenter server and unregistered extensions before standing with your network configuration.

At the aforementioned time, check the Next Steps afterwards network settings are configured successfully.
- All deployed plug-ins will need to be reregistered.
- All custom certififcates will need to be regenerated.
- vCenter HA will need to exist reconfigured.
- Hybrid Link with Cloud vCenter server will need to exist recreated.
- Active Directory volition need to be rejoined.
6. Click Finish.

One time update is 100% completed, close the window and get dorsum to vCenter Server Appliance Management Interface to test.
If yous want to alter the same GUI setting using vCenter Server SSH. Open beat out and change DHCP=no in the file /etc/systemd/network/10-eth0.network.

Besides to check the network settings, below you tin also cheque the suggested answers of vCenter no healthy upstream error.
- Check the validity of each certificate in vCenter server
- Upgrade VMware Hardware version and choose the correct Os for vCenter
*Note: Take a snapshot from vCenter Server VM earlier hardware version upgrade, as it's none reversible job to previous versions.
- Shutdown the vCenter >> correct click on the VM >> Compatibility >> Upgrade VM Compatibility.
- Right click on the vCenter and choose Edit settings >> VM Options >> Full general Options >> Select VMware Photon OS
- Check DNS (y'all should be able to resolve FQDN names from vCenter)
- Check NTP (Time should exist synced and right betwixt ESXi hosts and vCenter Server)
If all the services which are set to Automatic start are running without any errors or warnings, the error is solved. Every bit we mentioned, you should ready a consummate vCenter backup, Meanwhile, it'south necessary to backup VMware virtual machines to avoid the data loss due to reversible tasks.
Backup solution to prevent virtual machine crashes
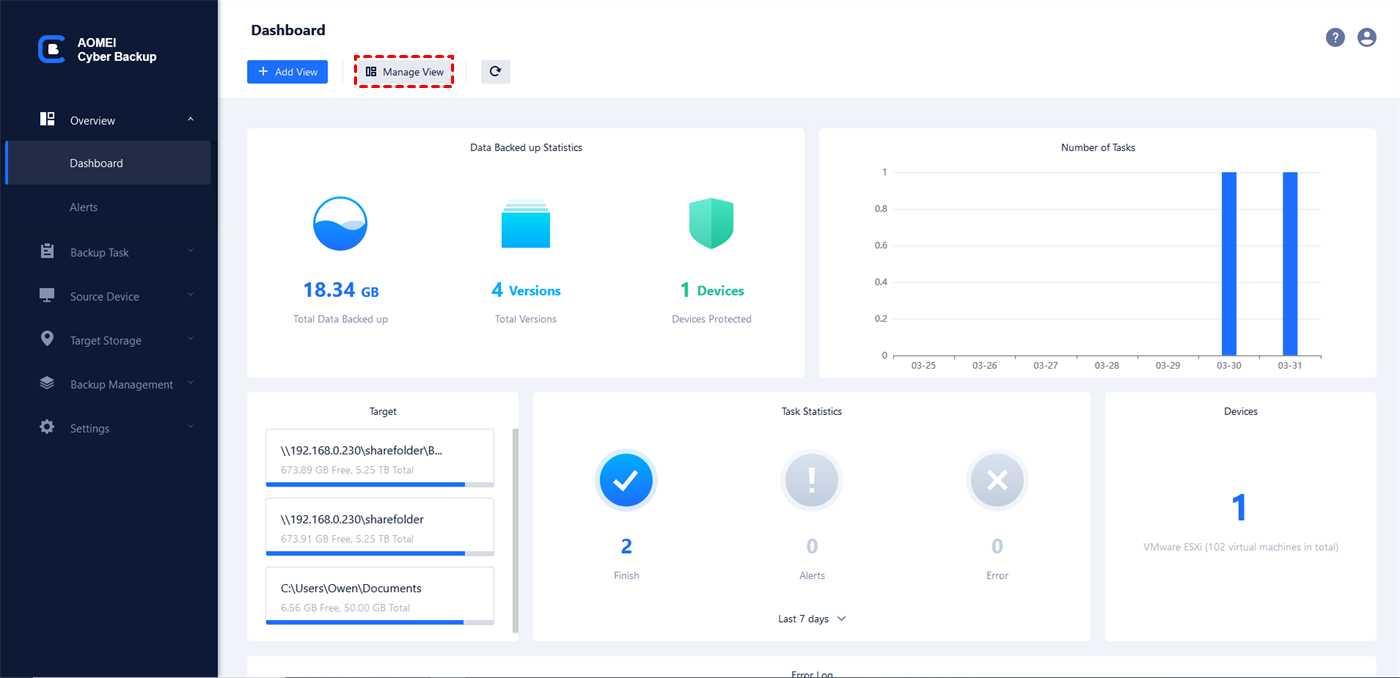
vCenter Server is a very convenient official platform for centrally managing ESXi virtual environments and large numbers of VMs on information technology. A single vCenter Server instance tin support a maximum of 1,000 hosts, 10,000 powered-on virtual machines and 15,000 registered virtual machines.
However, vCenter Server does not provide the feature of virtual machine fill-in. And that makes backup software a usually accepted selection. A professional fill-in tool is more efficient than the built-in features.
Here I innovate you to a VMware fill-in software -- AOMEI Cyber Backup. It offers you the following benefits.
✦ Agentless Backup: create complete and independent prototype-level backup for VMware ESXi and Hyper-V VMs.
✦ Multiple VM Backup: batch backup big numbers of VMs managed past vCenter Server, or multiple VMs on a standalone ESXi host.
✦ Multiple Storage Destinations: fill-in to local or network share destinations.
✦ Automated Execution: create fill-in schedules to automate backups daily, weekly, or monthly.
✦ Restore Entire VM: restore immediately bachelor VMs from any selected restore points.
AOMEI Cyber Backup supports VMware ESXi 6.0 and later on versions. You lot tin can click the following push button to download the 30-day complimentary trial.
iv Steps to batch fill-in VMs on vCenter Server
one. Bind Devices: Access to AOMEI Cyber Fill-in web customer, navigate to Source Device > VMware > + Add together VMware Device to Add together vCenter or Standalone ESXi host. And so click … > Bind Device.

2. Create Backup Task: Navigate to Fill-in Chore > + Create New Task, and select VMware ESXi Backup every bit the Backup Blazon.
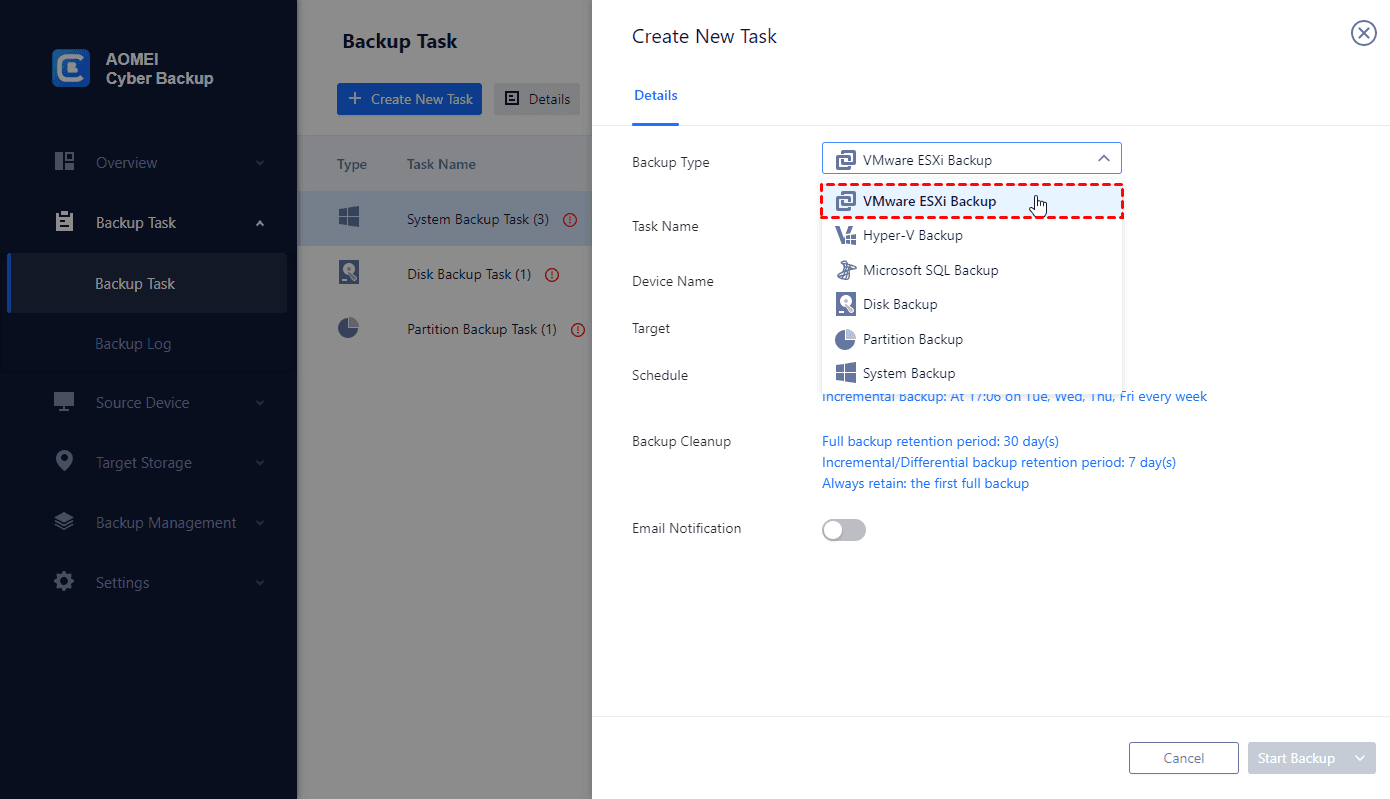
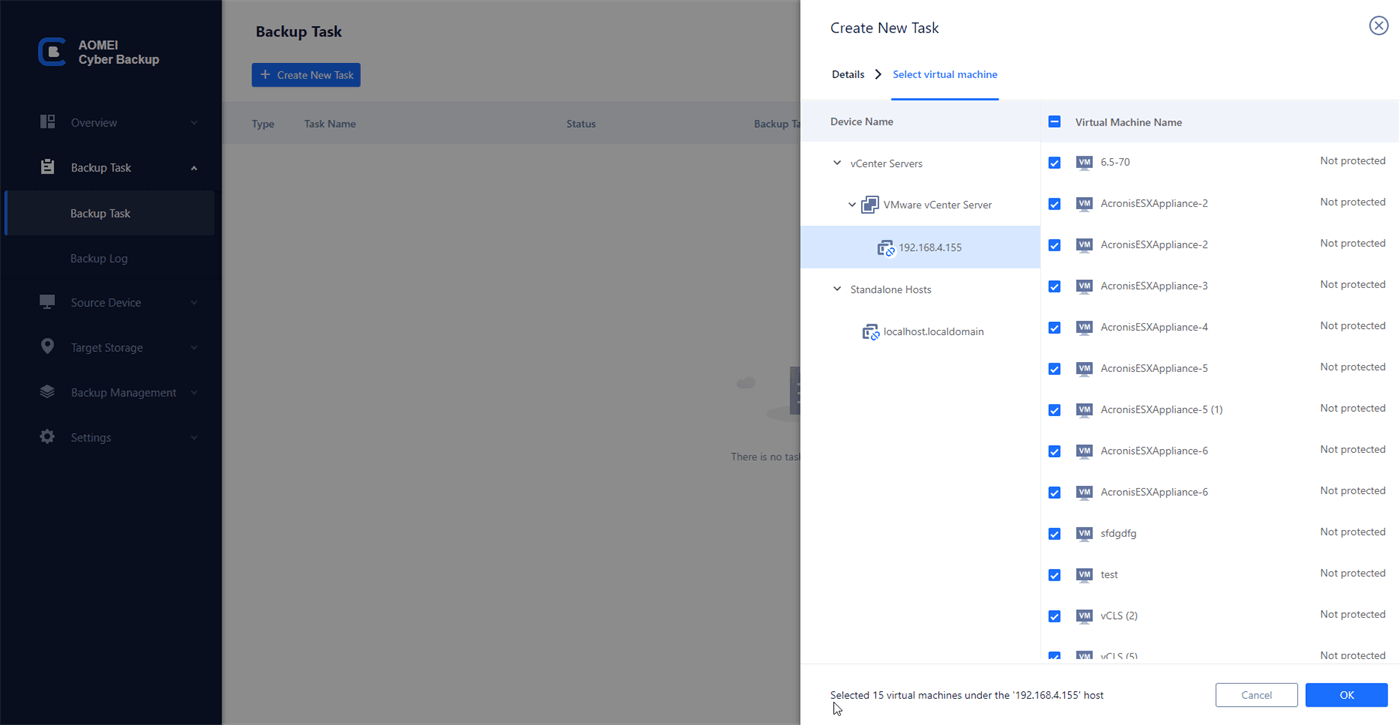
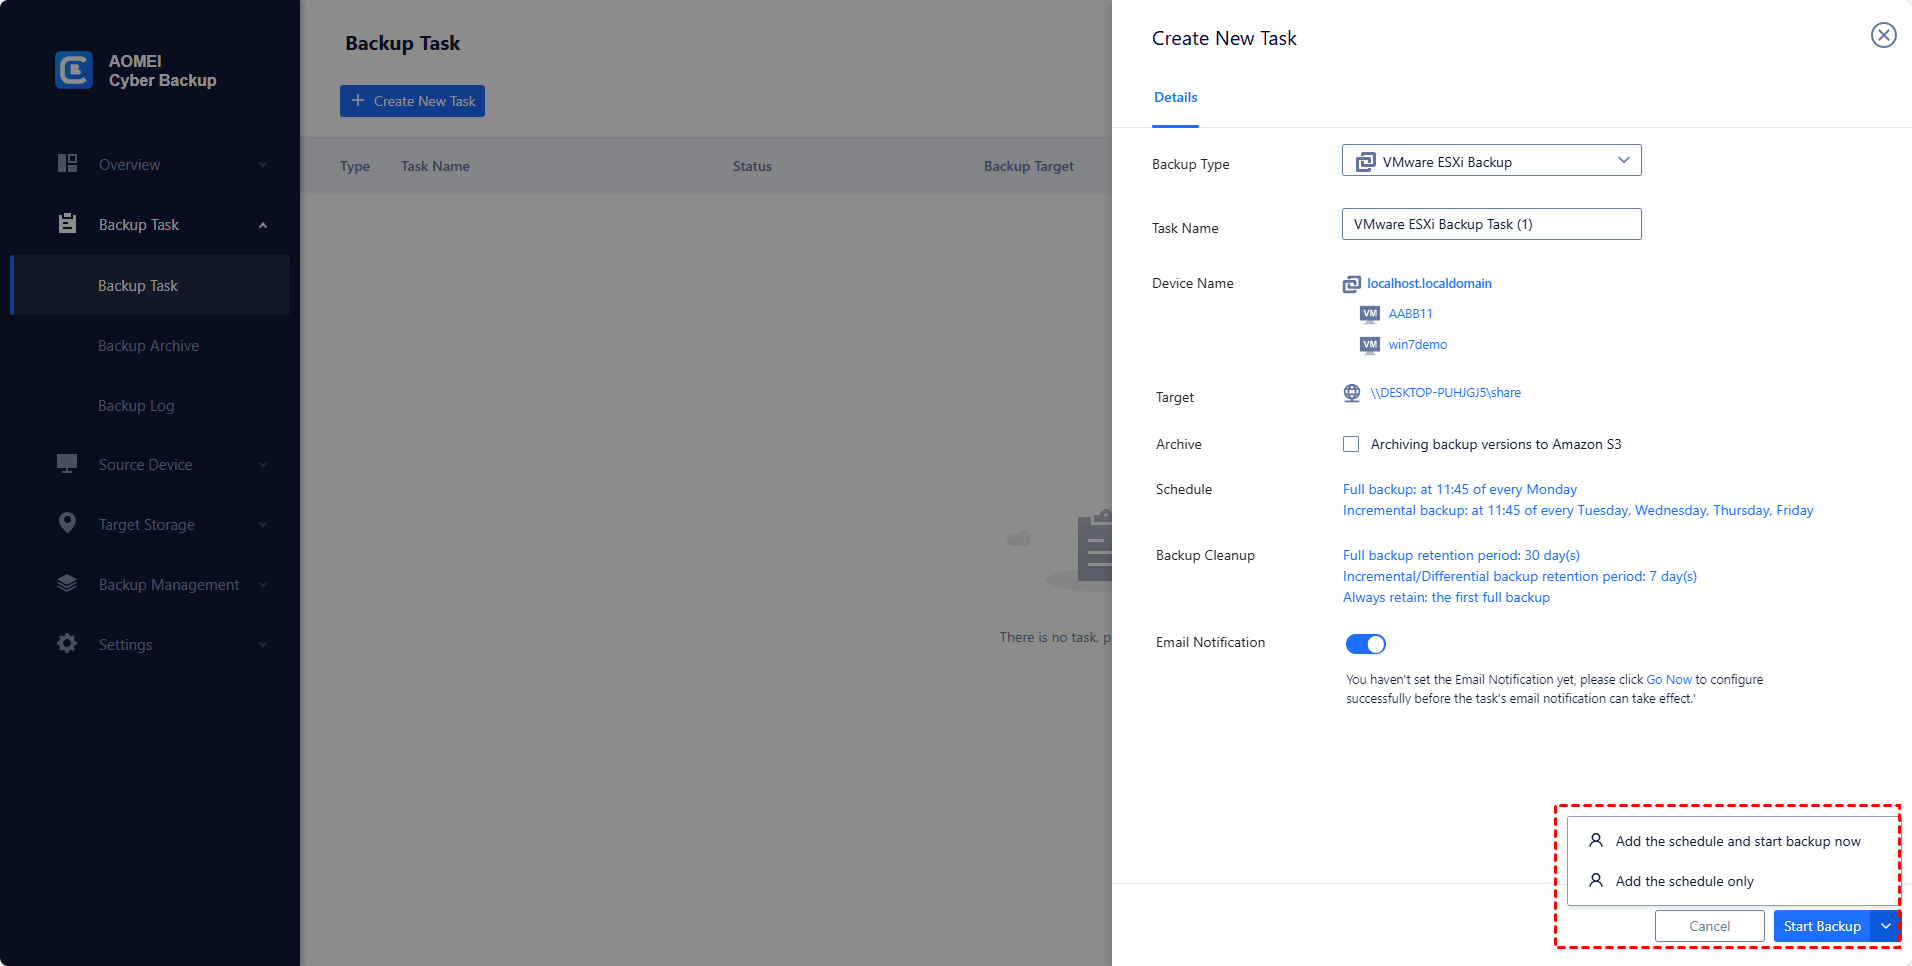
3. Set Task Name, Device, Target, Schedule, and Cleanup as needed.
- Task Name: you can change the chore proper noun or utilise the default name with an ordinal.
- Device: batch select large numbers of VMs managed by vCenter Server for centralized backup.
- Target: select to back up to a local path, or to a network path.

- Schedule (optional): perform full, differential, or incremental backup, and automate execution according to the frequency you specified.

- Cleanup (optional): automatically delete the sometime backup copies that exceed the retention period y'all specified.

iv. Run Fill-in: Click Start Fill-in and select Add together the schedule and start fill-in now, or Add the schedule only.
Created backup tasks will be listed and monitored separately, for progress checking, schedule changing and restoring. Information technology's piece of cake to make a clone of a virtual machine in the aforementioned or some other datastore/host, without reinstalling or configuring a new VM by clicking Restore to new location.

Summary
Later upgrading your vCenter apparatus, you may notice that vCenter is no longer working properly and display no healthy upstream error messages. This is definitely considering of some unexpected parameters while deploying the vCenter. And then this commodity describes the solutions of vCenter no healthy upstream. Besides the answer of networking, I as well presented the other solution to ready this fault at the terminate of the article.
Source: https://www.ubackup.com/enterprise-backup/vcenter-no-healthy-upstream.html
0 Response to "How To Fix No Healthy Upstream Error"
Post a Comment